Saturday, February 26, 2011

Jules Dalou


I like Dalou (1838-1902) for a couple of reasons. Not least of which was that he was technically superb, but also because of his politics. Though he worked on commissions for incredibly wealthy clients, he sided with the working-class politically and actually got himself into a lot of trouble by being a little too close to the Paris Commune. He was made to flee to England, and was given a life sentence (later repealed) in absentia.

Jules Dalou studied under Carpeaux (creator of the incredible sculpture Ugolino and his Sons), and created a number of fantastic public works including this rather raunchy depiction of bacchanalia.

I love the illusion of space that he created in a relatively shallow field, especially in the foreground, and the kneeling figure on the left. Look how his leg appears to recede. This work follows on from a post I made regarding a trompe l'oeil masterpiece by Gerard de Lairesse, and another on the work of Christen Kobke, who created a couple of masterful illusions of depth in grisaille.

Friday, February 25, 2011

How to Draw a Volute, or Acanthus Scroll


I don't think there is a more beautiful line in the world than the curve described above. Zeising went so far as to claim for the Golden ratio that;
"... [It is] the universal law in which is contained the ground-principle of all formative striving for beauty and completeness in the realms of both nature and art, and which permeates, as a paramount spiritual ideal, all structures, forms and proportions, whether cosmic or individual, organic or inorganic, acoustic or optical; which finds its fullest realization, however, in the human form."
Well actually the nautilus shell is not a true Phi-spiral, but it's pretty close so we'll go with Zeising's effusiveness for now. This is Part IV in the series How to Draw the Acanthus, and deals with the topic of how to draw a volute, or acanthus scroll.

I don't mean to mislead with the opening image, but in this instance we are going to look specifically at the Ionic volute (not the curve described by the logarithmic spiral above). I have linked out in this article to other mathematical scrolls if you're interested in further reading regarding Fibonacci numbers, Golden Spiral, or logarithmic spirals.

But first, a little background. The following quote is from Elements of Geometrical Drawing, by John Henry Spooner (1901), describing the Ionic volute.


Erechtheum capital from Stuart and Revett’s The Antiquities of Athens (1790)

James Stuart and Nicholas Revett’s The Antiquities of Athens (1790) was the book that popularized the Ionic order of the Erechtheum through it's beautiful illustrations. Historian Calder Loth points out that "The Erechtheum’s volutes are the most complex of all Greek Ionic capitals, having a series of tightly spaced creases or canals resembling fine drapery. The central swag in the canals, a characteristic feature of Greek Ionic capitals, emphasizes the drapery-like character." 

Corinthian Acanthus Scroll

The volute made it's way into the Corinthian order too. A Textbook on Ornamental Design (1901) introduces the Choragic monument of Lysicrates in Athens as "the principal structure of Greek origin designed in the Corinthian order", and describes the section of Acanthus scroll pictured above as showing...
"... not only the elaboration of ornament characteristic of this order, but also a principle of ornamental design that is of the utmost importance in its relation to the lack of invention of new forms and the restraining influences of certain art periods. It will be observed here that the various parts of the acanthus scroll grow out of one another in a continuous line. This is a principle of design that originated with the Greeks, and was continued by the Romans."
So we're beginning to see the importance of the scroll design, whether as described by the natural roll of a fern or shell, as evidenced in Greek, Roman or Islamic architecture, or as a mathematical design principle adopted by the likes of Le Corbusier. It seems we should probably learn how to draw one of these things then, right?

There is ample historic precedent for drawing the volute, but oddly the information seems to vary. A number of different methods are described in The New Metal Worker Pattern Book, by George Watson (1901). Spooner maintains that the ratio for describing it's curve is 7 : 6 : 5, and claims that the Greeks would agree. Another source follows a ratio of 6.5 : 5.5 : 4.5. [Though I am strictly a layman, these ratios seem like approximations to me; 7 : 6 is surely not the same as 6 : 5, nor is 6.5 : 5.5 as 5.5 : 4.5 (but please feel free to enlighten me). A more accurate Ionic ratio would be 7 : 6 : 5.143, which is what I will use here].


The point is that although the ratios may change, our method for constructing the volute remains the same. We could substitute 7 : 5.5 : 4.321 (which would describe a different curve) just as easily, but for now we will concentrate on drawing the distinctive ram's horn shape of the scrolls of an Ionic capital as described by Spooner's ratio.

Here are the steps you need to follow:

Fig. 1
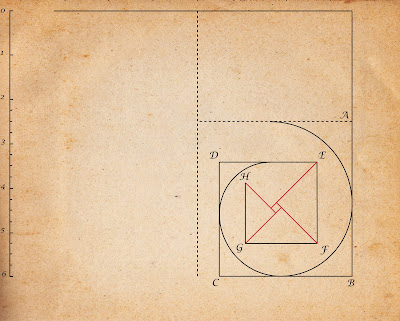
Step 1: I decided arbitrarily to start with a rectangle 3.5cm wide and 6cm tall [Fig. 1], and to start the convolutions of the curve at A, 3.5cm from the base of the volute.

Fig. 2

Step 2: So, according to the traditional ratio of 7 : 6 : 5.143, we divide the length of AB by 1.1666666666 to give us the length of BC. [In the case of the ratio 6.5 : 5.5 : 4.5, we would divide by 1.1818181818].

Continuing in this manner, we determine the length of CD [Fig. 2], by dividing BC by 1.1666666666. This gives a length for CD of 2.57cm .

Fig. 3

Step 3: Next, draw lines through the points ABCD at 45º [Fig. 3] to where they intersect to form a rectangle in the middle.


Fig. 4
Step 4: See that little rectangle that you just made? You'll have to find the midpoints of each of those sides. Let's call them 1,2,3, and 4. Now draw lines perpendicularly from those midpoints to intersect AB, BC, and CD [Fig.4].

Fig. 5
Step 5: Using 1 as the center of the first arc, describe the curve connecting the top of the volute to AB [Fig.5]. Similarly; using 2 as the center of the second arc, we describe the curve connecting AB to BC, use 3 as the center to describe the curve from BC to CD, and 4 as the center to describe the curve from CD back around for the first full rotation of the spiral 

Fig. 6
Step 6: Let's now draw the second, inner rectangle EFGH which we will use to draw the second revolution of the spiral [Fig. 6].

According to our 7 : 6 ratio, DE = 2.2cm [CD ÷ 1.16666666].
EF = DE ÷ 1.16666666 = 1.9cm.
FG = EF ÷ 1.16666666 = 1.6cm.
GH = FG ÷ 1.16666666 = 1.37cm

Fig. 7
Step 7: As in Step 3, draw lines from points E,F,G,H, at 45º to where they intersect in the middle to form a rectangle [Fig. 7].

Fig. 8
Step 8: Draw lines perpendicularly from points 5,6,7 and 8 to connect with DE, EF, FG, and GH [Fig. 8].

Fig. 9
Step 9: Connect the dots (as in Step 5), using points 5,6, and 7 as the centers of our arcs [Fig. 9].

Fig. 10
Step 10: If you wished, you could repeat Step 6 through 9, to give you a third inner curve to the spiral, but I'm going to stop here. From the last point (8), instead of describing a short arc, we continue around and draw a full circle [Fig. 10], which is the central circle of our newly completed volute. So there you have it.

Fig. 11

Step 11: I could have just stopped at Step 10, but I'm going to add two more steps. I want to extend and soften the curve at the top (or the "thread", to borrow a term from a stair-makers lexicon). This will make it look more like the acanthus scroll. In order to do that, take the line that passed through Point 6 and Point 1 [Fig. 11] and extend it out to the left. Here's where a little creativity comes in. Draw a line at 45º that intersects with your horizontal line at point a'. You can position that line wherever you want.

Now draw an arc centered on Point a', that goes from Point 1 and stops where it intersects the 45º line.


Fig. 12
Step 12: Now we're going to finish it off. Using a point (b') further down the 45º line as a new center point for the last section of the arc, connect Point 2 and Point 3 [Fig. 12].

Here is the completed scroll without all the construction lines, and with one of the beautiful ornament drawings of the acanthus scroll from a previous blog post superimposed for comparison:


Monday, February 14, 2011

Ornament Drawings

The best drawing I have found of the structure of the acanthus scroll
These incredible details are from a huge (13 3/4" x 9") three volume set of prints engraved in 1872 by C. Claesen entitled Spécimens de la décoration et de l'ornementation au XIXe siècle. The amount of work involved In the drawings alone is staggering, let alone the time spent carving them out of stone or wood, casting them in iron, gilding them, painting them on panels, or sculpting them in clay and casting them out of plaster. These guys must have been just churning this stuff out. It's no wonder they got a little weird every now and then, like: What exactly are these two monkey people up to?


The quality of the draughtsmanship in every engraving is just superb. I'm giving you a close up view here, hoping that you'll enjoy these as much as I do. They are exquisite examples of how to draw ornament.

I posted a set of 187 images from the book here, on my Flickr page. Don't forget to click the largest size before you download.


Thursday, February 10, 2011

How to Paint Trompe l'Oeil


Wouldn't we all like to be able to paint like this guy?

Gerard De Lairesse's trompe l'oeil grisaille masterpiece is an excellent lesson in how to paint trompe l'oeil. Taking a closer look at Allegory of the Sciences, we can discern his technique for creating a successful illusion of depth - particularly with reference to the value range he employed.

When I speak of 'value' here, I'm referring to the Munsell color system. I personally use the term interchangeably with 'tone' or 'tonal value', although that's probably not correct.

I will never forget speaking with my friend Dermot Power (concept artist for films such as Star Wars, Harry Potter, Batman Begins, Charlie and the Chocolate Factory and Alice In Wonderland), who told me that you have to be really careful with highlights: The sign of a novice is the tendency to touch everything with a dot of white on the highest point. "It looks like it's snowing" he would say. That really stuck with me.

Examining De Lairesse's painting, we can see that he reserved his brightest highlights and darkest lowlights for a section of the painting occupying no more than 30% of the overall composition, inside the lower right section above. I'm calling this his 'High Contrast' section.

The rest of the canvas is roughly broken in half by two areas of 'Medium Contrast' and Low Contrast'. It is important to recognize the sense of balance achieved by this: the painting neither jumps out at us, nor recedes too much. In my opinion, a general rule of thumb would be to divide the 'value sections' of your canvas into percentage divisions of 30/40/40, as above. If every area within the painting was given the same value range the trompe l'oeil effect would be flattened and unconvincing.

'High Contrast' sample, with tonal range
'Medium Contrast' sample, with tonal range
'Low Contrast' sample, with tonal range

Let's examine this further: Sampling from the High, Medium and Low Contrast areas above and isolating the value of the tonal ranges, we see that the ranges are represented within the graph below.


When plotted against the fullest possible value range (solid black through white), we notice some interesting things. To begin with; even the area that contains the darkest lowlights and lightest highlights (lower right section of the painting with the seated figure), doesn't come close to representing the full range of tones available. In other words, the outside boundaries of the value range De Lairesse employs represents no more than 75% grey at its darkest, and 25% grey at its lightest.

Of course, this is borne out through our own observations of nature: Shadows are never 100% black, nor are highlights 100% white. That last point is worth restating, because I have seen it done incorrectly many times: Highlights in trompe l'oeil painting are never 100% white. What? Oh alright, not "never", but let's just say they should be used extremely sparingly. Unless you're rendering a high gloss sheen on a white marble statue, pure white highlights should be a last resort.

The value of pure white (Value 10 according to Munsell) and the value of pure black (value 0) are actually unattainable with pigment, being theoretical limits.

The following illustration of spheres receding in space uses the same value range De Lairesse employs to differentiate between foreground and background objects. You can plainly see that the optical laws of chiaroscuro apply: If you want an object to appear to recede in space, limit the values to the middle of the spectrum.
Note that the whitest highlight in the foreground sphere is still not pure white

The point gets a little confused here due to the fact that we are dealing with a grisaille representation of carved statuary, not simply a painting of objects in space, as say, a trompe l'oeil landscape. Our objective is to convey a sense of how an object is carved in stone. So not only do we flatten the value range to represent how an object recedes from us, we also flatten the it when representing objects in low relief, as in the detail of the frieze, below.


I posted these before, but they are such perfect examples of trompe l'oeil low-relief cameos that I am adding them here again. They are by the artist Christen Kobke, and demonstrate precisely the technique of expanding the value range to imply high relief, and reducing the value range to imply low relief. And yes; these are paintings!


Note the reduced range of tonal values in the low relief of the wing

Generally speaking though (when painting trompe l'oeil molding for example), there is a simple rule of thumb that we should adhere to when dealing with middle distance objects, of medium relief: That is the rule of thirds. Roughly speaking, a sphere should be divided into thirds between highlight, mid-tone and shadow, as below.
Not only that, but an accent tone, light or dark, should be one third the width of the half-tone, as below:


Tuesday, February 8, 2011

Gerard de Lairesse


Cesare Ripa is a fascinating figure: Beyond the fact that he worked as a cook and butler little else is known of his life, and yet he somehow managed to publish a book in the early 17th C. that was a smash hit with writers, poets and artists for two hundred years.

It was called Iconologia, and was "based on Egyptian, Greek and Roman emblematical representations. The book was used by orators, artists and poets to give substance to qualities such as virtues, vices, passions, arts and sciences."

Dutch painter Gerard de Lairesse, like so many of his contemporaries, relied heavily upon Iconologia to develop the visual language for his paintings. Here is a huge file of his splendid trompe l'oeil work titled Allegory of the Sciences.

You're welcome!

Sunday, February 6, 2011

Antique Map Cartouches


I love antique maps. The combination of gorgeous ornament, the romantic whiff of aging prints, and magic of Terra Incognita is a winner. It reminds me of the apocryphal ad placed by the legendary Ernest Shackleton looking for a crew:
 "MEN WANTED FOR HAZARDOUS JOURNEY. SMALL WAGES, 
   BITTER COLD, LONG MONTHS OF COMPLETE DARKNESS,
   CONSTANT DANGER, SAFE RETURN DOUBTFUL. HONOR AND
   RECOGNITION IN CASE OF SUCCESS."
I've never been one to let the truth get in the way of a ripping yarn [this ad may never have been placed], and Shackleton's voyage South is by far the rippingest of yarns I've ever read. It's that "safe return doubtful" part that gets me every time. I love the idea of these hard-men heading into the blank of a map with naught but a pouch of tobacco and dead reckoning.

On a different note, there was an article in the New Observer recently about the death of blogging; basically saying that any idiot with a 'Sarah Palin' Google Alert and a keyboard can regurgitate other peoples work into a blog entry. Well here's yet another uncreative blog post by me. Other people's work again.

It's always been the case with me that I try to write the blog I wish I had found when I was starting out. Lots of large images and little commentary. So I'll skip the pithy one-liners and the wiki-links this time and just present the work itself, because I think it's beautiful.

Rather than choke the inbox of the few faithfuls who subscribe to this blog, I'm posting just a couple out of my collection of cartouche images here. The rest are here, on my Flickr page.